Integrate Google drive into iOS app in 2021
Recently, I integrated Google drive service into Oh Music.
Before I did this, I look a few tutorials from web blog & Youtube channel to know what steps I need to follow. Although those tutorials is good, but they are outdated. In July/14, 2021, Google release a new 6.0.0 version for Google SignIn SDK, which changes everything. The whole integration working flow of Google SignIn is changed. Because that is quite new, there is no materials about it. I only thing I could follow is Google SDK doc, thus I'm on my own. I think it is a common pain for developer to use some 3rd party library/framework, because they could be outdated, poor documentary, even more the owner could abandoned it in anytime.
Enough trash talk, let's start. The agenda as below:
- Create iOS project
- Request Google API key
- Install dependency pods
- Start to implement Google SignIn in project
- Create API methods to access Google drive
1. Create iOS project
Download the full code in repo, it is free to use. We will configure it later.
2. Request Google API key
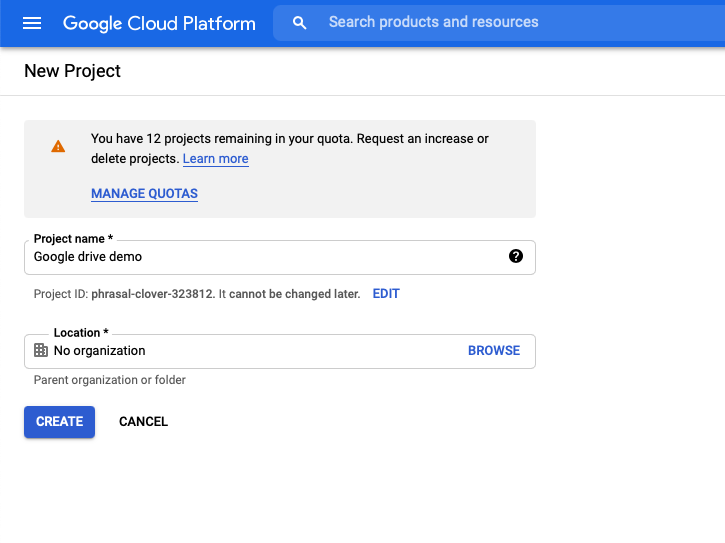
First, we need to apply an API key. Open Google cloud console, the page layout may change per time. But you should find "Select a project" button on the left top of page and click it, then in the new window select "NEW PROJECT" and name your project.
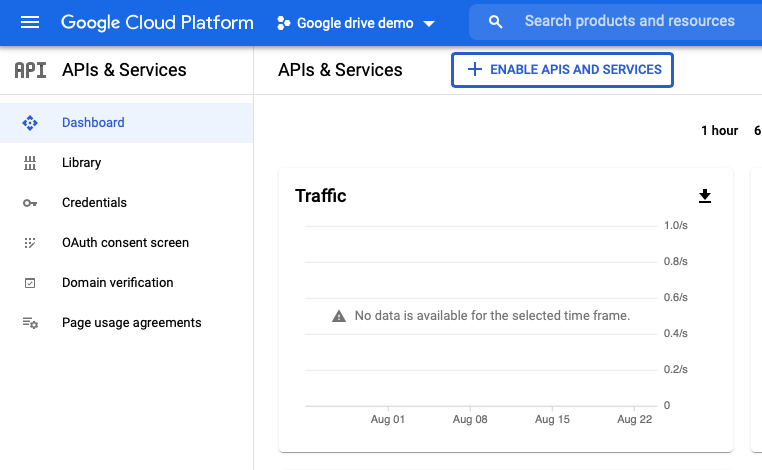
In the left menu, select APIs & Services, then select your project in the newly opened page. Select ENABLE APIS AND SERVICES button.
OK, the project is created.
Now, we need to create credentials for our app.
In general, credential acts as a paper storing some information of your app, after provide those information, your iOS app could access enabled APIs. Select credential in left menu, and choose OAuth client ID in the drop-down list because in this demo our app acts as a client.

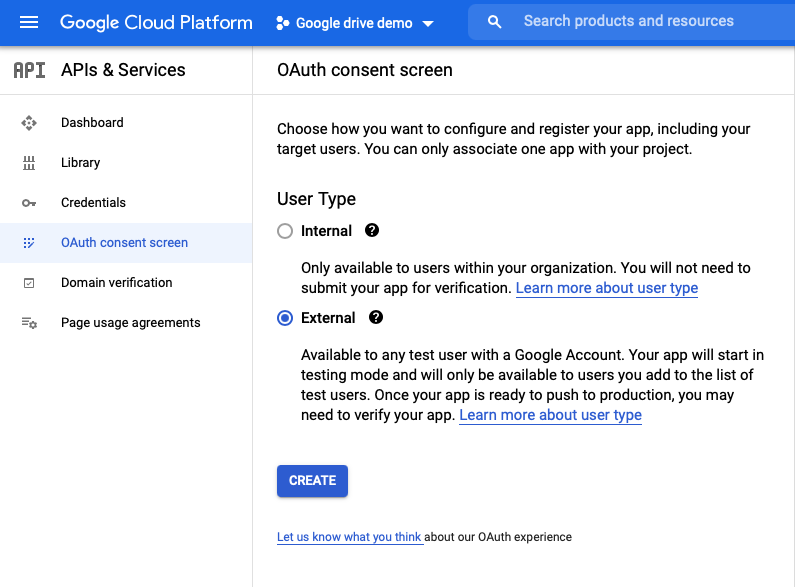
Here we need to configure a consent screen before create the credential. That is like an agreement with Google. Boring? Yes, it is really an unpleasant process, but we almost done. Choose external and fill the consent screen page.
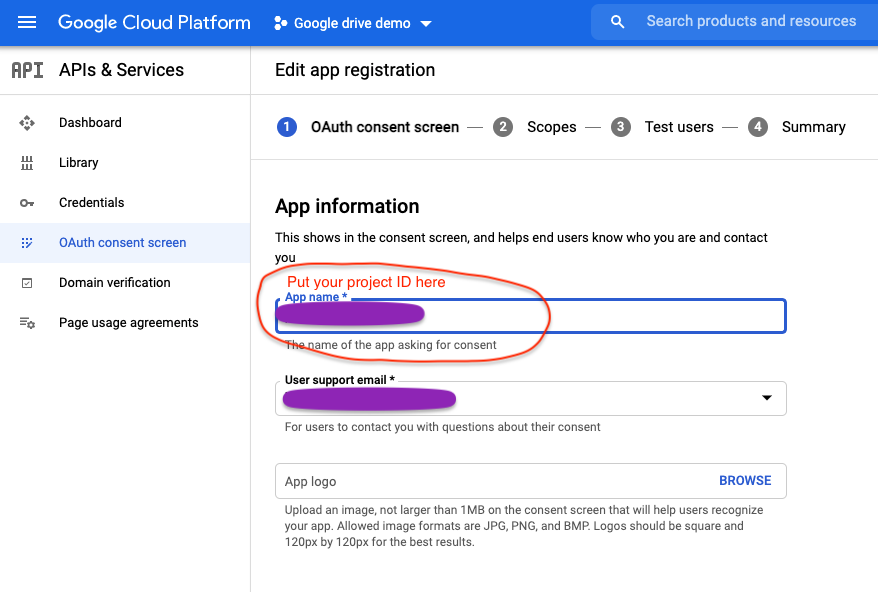
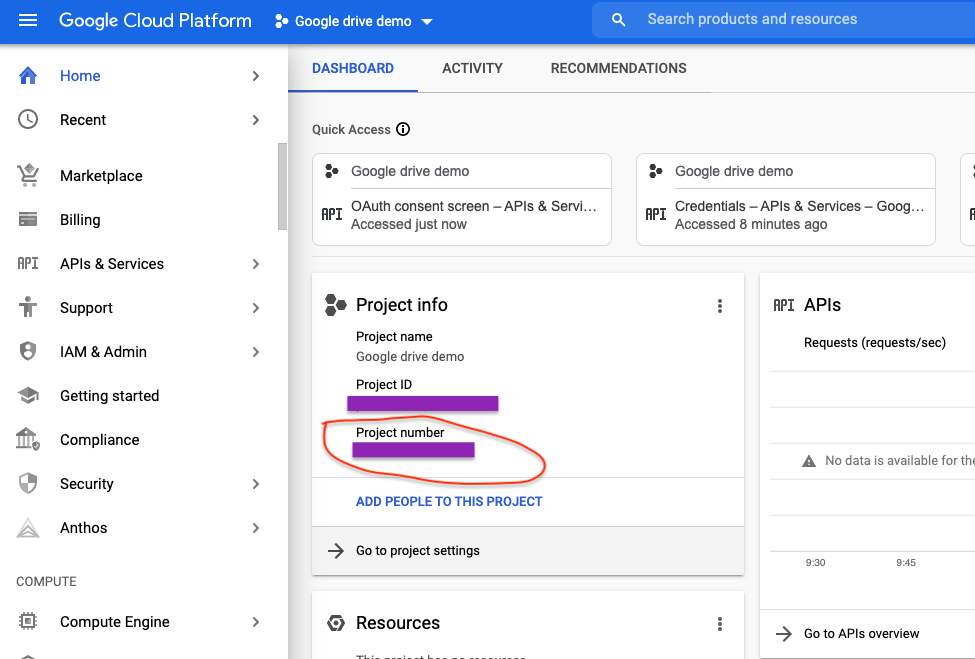
Put your project ID instead app name in app name field, otherwise we cannot save it. It is like a bug in Google side. And you could find your project ID in dashboard page.
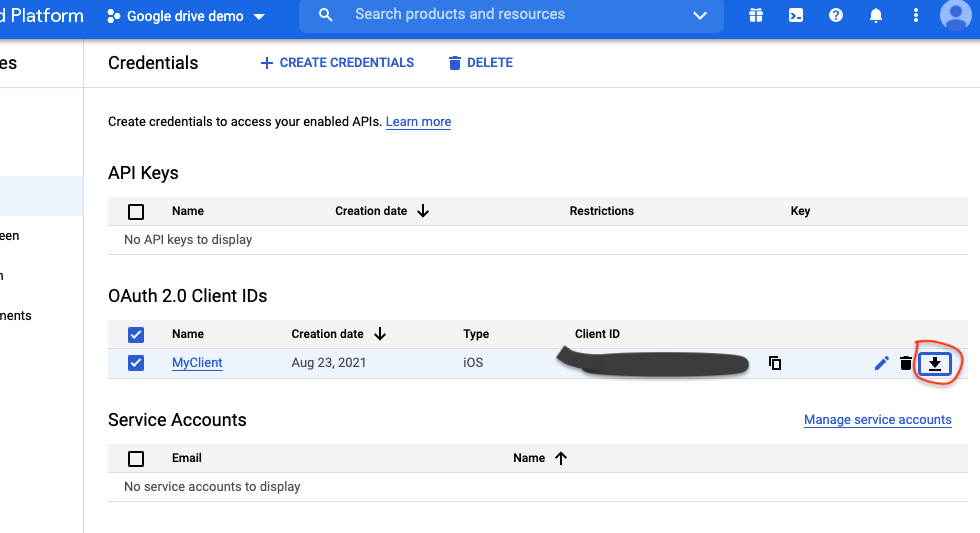
Finally we could create our credential, select application type as iOS and fill your app bundle id in Xcode project.
After it, download the plist file, we will use it to configure our project later.
3. Install dependency pods
Google APIs Client Library is a library written by Google for accessing Google APIs. Go ahead and add the following library to your Pod file. Then do Pod install.
pod 'GoogleSignIn'
pod 'GoogleAPIClientForREST/Drive'
Open your project (the xcworkspace one) in Xcode, build it. You may get below warning:
"The iOS Simulator deployment target 'IPHONEOSDEPLOYMENTTARGET' is set to 8.0, but the range of supported deployment target versions is 9.0 to 14.5.99."
That is because Xcode 11+ will not support deployment target version 8 and below. Put below code in your Podfile, that will ensure your deployment target > 9.0 each time you do pod install.
post_install do |installer|
    installer.pods_project.targets.each do |target|
        target.build_configurations.each do |config|
            config.build_settings['IPHONEOS_DEPLOYMENT_TARGET'] = '9.0'
        end
    end
end
And if you are using Mac M1 like me, put below code into Podfile too. That ensure your simulator build config supports arm64 architecture for your pods.
installer.pods_project.build_configurations.each do |config|
    config.build_settings["EXCLUDED_ARCHS[sdk=iphonesimulator*]"] = "arm64"
end
Put below code in your info.plist, the REVERSED_CLIENT_ID is from the plist we just download from Google credential page. This is for URL Schemes, basicly it allows users to open your app from a custom URL. More info please refer to Defining a Custom URL Scheme for Your App.
<key>CFBundleURLTypes</key>
<array>
    <dict>
        <key>CFBundleTypeRole</key>
        <string>Editor</string>
        <key>CFBundleURLName</key>
        <string>googleDrive</string>
        <key>CFBundleURLSchemes</key>
        <array>
            <string>REVERSED_CLIENT_ID</string>
        </array>
    </dict>
</array>
4. Start to implement Google SignIn in project
What changes are made in v6.0.0, you could find it from migration guide
Ok? let's apply them in code one by one.
First, open StateManager file in Dependency folder. We have two dependencies here, and don't forget to replace Client_ID with yours. The signInconfig will link your client id to signIn config. And GoogleDriveAPI is an API class we will talk about later. We will inject StateManager instance to our viewControllers, if you don't know what is dependency injection, it means that your view controller doesn't get the dependencies it needs by itself, but the dependencies are provided from outside. Please check more in my another article about it.
class StateManager {
    // set your client id here
    let signInConfig = GIDConfiguration.init(clientID: "Client_ID")
    var googleAPIs: GoogleDriveAPI? = nil
}
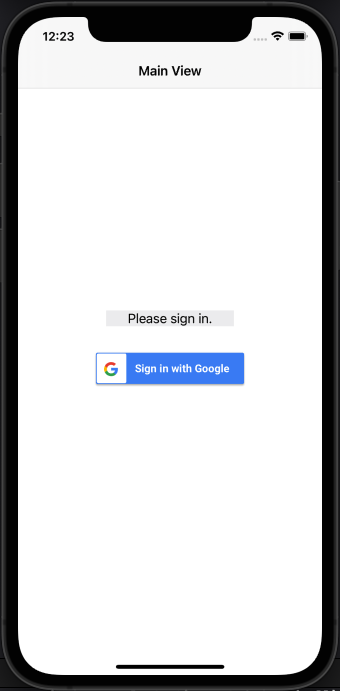
Switch to ViewController file, in this file we have signIn, signOut buttons and a UILabel to show user signIn state. And we will implement the signIn logic in this viewController.
You may notice signInButton has type GIDSignInButton, which is from Google SDK. It could give us a "Sign in with Google" button, and you could set colorScheme and style for it. Sign in with Google
var signInButton: GIDSignInButton = {
    let btn = GIDSignInButton()
    btn.translatesAutoresizingMaskIntoConstraints = false
    btn.style = .wide
    btn.colorScheme = .dark
    btn.layer.cornerRadius = 8
    btn.addTarget(self, action: #selector(signInButtonTapped), for: .touchUpInside)
    return btn
}()
Then we call restoreSignIn method in viewDidLoad to restore a previously authenticated user without interaction. Which means no need to signIn again.
func restoreSignIn() {
    GIDSignIn.sharedInstance.restorePreviousSignIn { [weak self] user, error in
        if error != nil || user == nil {
            print("ERRRR: \(String(describing: error)), \(String(describing: error?.localizedDescription))")
            self?.updateScreen()
        } else {
            // Post notification after user successfully sign in
            guard let user = user else { return }
            print("restore signIn state")
            self?.createGoogleDriveService(user: user)
        }
    }
}
If we could get a valid user from that asynchronous closure, then we call createGoogleDriveService(user:) to create Google drive service.
func createGoogleDriveService(user: GIDGoogleUser) {
    // 1. set service type to GoogleDrive
    let service = GTLRDriveService()
    service.authorizer = user.authentication.fetcherAuthorizer()

    // dependency inject
    stateManager.googleAPIs = GoogleDriveAPI(service: service)

    // 2. To ensure that your Google API calls always have a new authorizer
    user.authentication.do { [weak self] authentication, error in
        guard error == nil else { return }
        guard let authentication = authentication else { return }

        // get an object that conforms to GTMFetcherAuthorizationProtocol for
        // use with GTMAppAuth and the Google APIs client library.
        let service = GTLRDriveService()
        service.authorizer = authentication.fetcherAuthorizer()

        // 3. dependency inject
        self?.stateManager.googleAPIs = GoogleDriveAPI(service: service)

        // 4. open GoogleDriveViewController page when authentication is complete
        let vc = GoogleDriveViewController()
        vc.stateManager = self?.stateManager
        self?.navigationController?.pushViewController(vc, animated: true)
    }
}
Breakdown:
- Create GTLRDriveService would create a Google drive service.
- To ensure that your Google API calls always have a new authorizer.
- We inject dependency into stateManager's googleApis property.
- Open GoogleDriveViewController page when authentication is complete, that is where our Google drive files would be presented.
Note! The signIn steps would be changed per time, do look at Google signIn guide first.
Finally, let's implement our signInButton.
@objc func signInButtonTapped(_ sender: Any) {
    // 1
    GIDSignIn.sharedInstance.signIn(with: stateManager.signInConfig, presenting: self) { [weak self] user, error in

                guard let self = self else { return }

        if let error = error {
            print("SignIn failed, \(error), \(error.localizedDescription)")
        } else {
            print("Authenticate successfully")
            let driveScope = "https://www.googleapis.com/auth/drive.readonly"
            guard let user = user else { return }

            let grantedScopes = user.grantedScopes
            print("scopes: \(String(describing: grantedScopes))")

            // 2
            if grantedScopes == nil || !grantedScopes!.contains(driveScope) {
                GIDSignIn.sharedInstance.addScopes([driveScope], presenting: self) { [weak self] user, error in

                                        if let error = error {
                        print("add scope failed, \(error), \(error.localizedDescription)")
                    }

                    guard let user = user else { return }

                    DispatchQueue.main.async {
                        print("userDidSignInGoogle")
                        self?.updateScreen()
                    }

                    // Check if the user granted access to the scopes you requested.
                    if let scopes = user.grantedScopes,
                        scopes.contains(driveScope) {
                            print("Scope added")
                            // 3
                            self?.createGoogleDriveService(user: user)
                        }
                    }
                }
            }
        }
}
Breakdown:
- Call GIDSignIn's signIn method, and passing your signInConfig to it.
- Request Google drive scope if it doesn't exist in scopes.
- Create Google drive service.
That is all the things for our ViewController.
Switch to GoogleDriveViewController file. In this file, we will call our custom Google API methods to list files in google drive. I used a tableView to show the file items and we will recursively instantiate this VC to deal with endless folder depth situation. I think this is a classic scenario where we could apply recursion into our real project. We will use googleAPIs?.listFiles() and googleAPIs?.download to list all files and download a file.
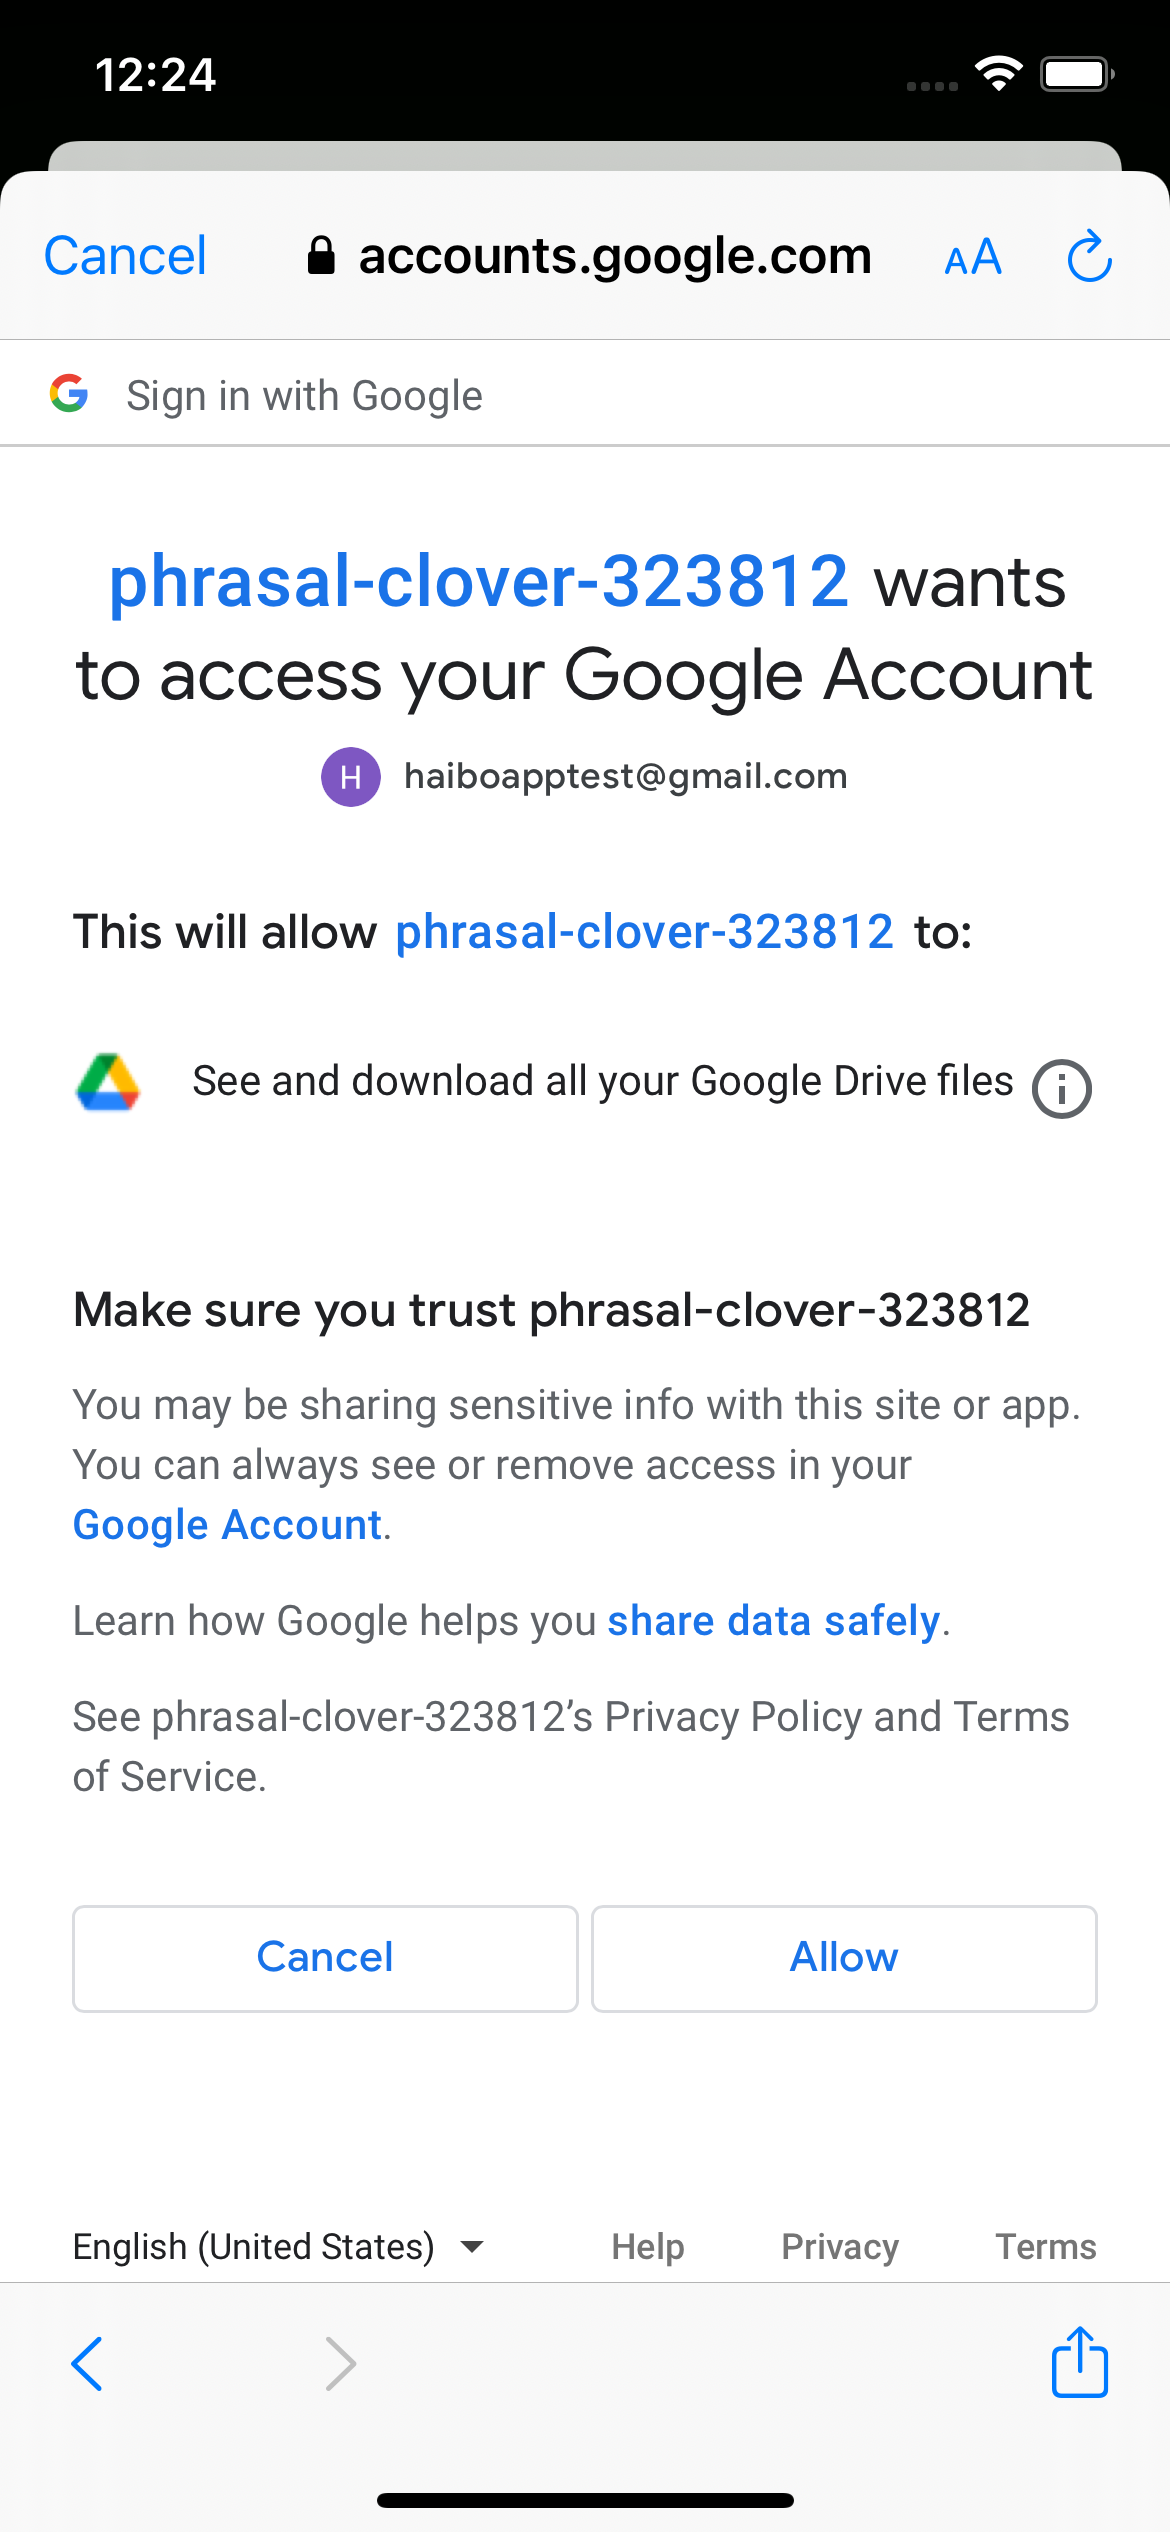
Add test user email first, otherwise you would not able to access Google service.

Build and run the project. If everything are going well, you should see the consent screens as below.
Well, that is all. For implementation details, refer to my repo.
If you like my articles, please consider buying a coffee in the bottom-left corner
Where you should go from here?
- If you want to publish your app to App Store, under "OAuth consent screen" menu, set your app's publishing status to "Publish app", after doing that you will go to the verification process, and once you submit your request, Google will verify your request and reply you in 1~2 days.
- Try to create other API methods like delete, update. Or try on other Google service like calendar.
- You may want to integrate other cloud drive service into your app, just go ahead to their SDK page, and follow the guide. Those steps are basicly the similar. Although I'd suggest not to try One Drive since the latest version of One Drive SDK is from 2015, I'm sure it is outdated.